|
|
|
Porsche, and the Porsche crest are registered trademarks of Dr. Ing. h.c. F. Porsche AG.
This site is not affiliated with Porsche in any way. Its only purpose is to provide an online forum for car enthusiasts. All other trademarks are property of their respective owners. |
|
|

  |

| robkammer |
 Apr 18 2026, 10:59 AM Apr 18 2026, 10:59 AM
Post
#1
|
|
Robbo  Group: Members Posts: 270 Joined: 7-January 21 From: Vermilion Ohio Member No.: 25,049 Region Association: NineFourteenerVille |
Teeners, as the time gets closer to my engine being delivered, I’m closing in on finishing the engine bay. I’ve installed new seals in our 88 911, but the 914 seal rails don’t appear to have any openings to start at. ANY helpful tips will be appreciated. Thanks, Robbo
|
   |

 
|
| Chad911sc |
Apr 18 2026, 12:27 PM
Post
#2
|
|
Member Group: Members Posts: 306 Joined: 24-September 24 From: Florida Member No.: 28,374 Region Association: South East States |
The big thick rear engine seal has an opening that you can slide it into and work it around easily. The sides and the front seal, I just pried open the end of the rail slightly, and started the seal into the rail. Worked it down into place, and then taped the rail back into shape with small body hammer very lightly.
Attached thumbnail(s) 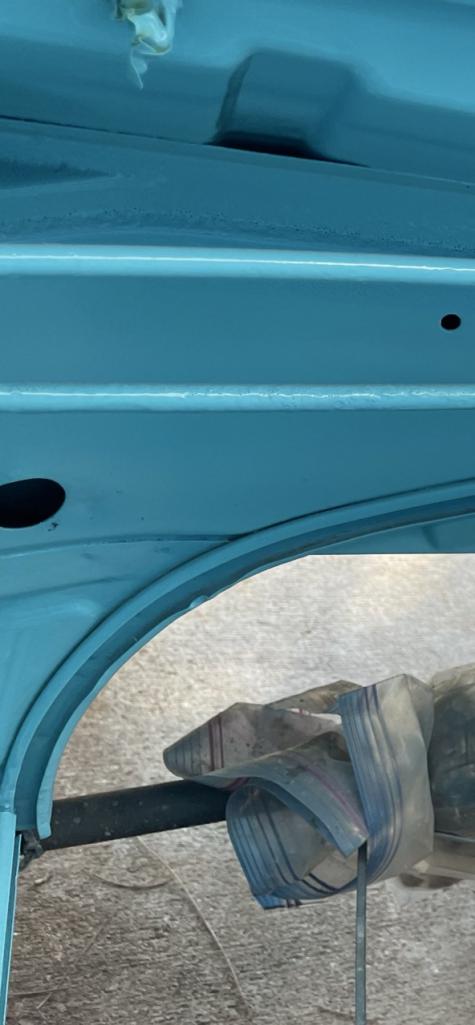
|
|
|
|
| bdstone914 |
Apr 18 2026, 04:49 PM
Post
#3
|
|
bdstone914 Group: Members Posts: 5,294 Joined: 8-November 03 From: Riverside CA Member No.: 1,319 |
Clean the channels well and lube them. Lube the seals and pull in so they stretch and thin as they go in. Pull in past the end of channel as they will take a while the retract. After they have sat for a day trim and use hog rings to hold the side seaks to the front firewall seal.
Drink beer and swear a lot. It does not help to install the seals but makes you feel better |
|
|
|
| bdstone914 |
Apr 18 2026, 04:50 PM
Post
#4
|
|
bdstone914 Group: Members Posts: 5,294 Joined: 8-November 03 From: Riverside CA Member No.: 1,319 |
Oops
|
|
|
|
| robkammer |
Apr 19 2026, 05:51 AM
Post
#5
|
|
Robbo Group: Members Posts: 270 Joined: 7-January 21 From: Vermilion Ohio Member No.: 25,049 Region Association: NineFourteenerVille |
Thanks guys! Sounds about the same as when I did the 911, sweating,swearing, and this time I’ll add beer!
|
|
|
|
| TRP |
Apr 19 2026, 07:57 AM
Post
#6
|
|
Member Group: Members Posts: 308 Joined: 2-September 23 From: Morgan Hill, CA Member No.: 27,559 Region Association: None |
I just completed this task last weekend. As Bruce mentioned, clean thr channels and remove any dings /high/lo spots in the lip. I laid the seals in the sun for a bit to soften them upp/straighten them out. Instead of trying to yoink/drag/pull that rubber lasagna noodle through a 1/2" channel, I started by placing the lower lip of the seal edge in the channel; you can feel it when its in the right spot. Then pushed the upper lip/edge under the upper channel lip with a big thick flat blade screwdriver or interior panel tool. I juat kind of worked from left to right / front to back. It went pretty quickly. Once you get to the end, you can see if there are any areas that need to be adjusted. I wiggled/flexes the seal up and down in the channel once I was done; you can feel the seal settle into place.
The curved seal just takes patience and some glycerin to lube the rubber and channel. Any dents or dings will cause you grief. |
|
|
|
| Mikey914 |
Apr 19 2026, 02:49 PM
Post
#7
|
|
The rubber man Group: Members Posts: 12,780 Joined: 27-December 04 From: Hillsboro, OR Member No.: 3,348 Region Association: None |
The other technique is to put one edge in and use a large flat screw driver to push the other in. The only advantage is that it will not have lateral tension on the rubber.
The method originally described should NOT be used on the targa to window seals on the roof. They do retain tension and with vibration they will appear to "shrink" after cut. |
|
|
|
| rgalla9146 |
Apr 20 2026, 08:58 AM
Post
#8
|
|
Advanced Member Group: Members Posts: 4,956 Joined: 23-November 05 From: Paramus NJ Member No.: 5,176 Region Association: None |
QUOTE(bdstone914 @ Apr 18 2026, 06:49 PM)  Clean the channels well and lube them. Lube the seals and pull in so they stretch and thin as they go in. Pull in past the end of channel as they will take a while the retract. After they have sat for a day trim and use hog rings to hold the side seaks to the front firewall seal. Drink beer and swear a lot. It does not help to install the seals but makes you feel better (IMG:style_emoticons/default/agree.gif) Bruce is right about the hog rings, for some reason they are never replaced. One more detail that I've seen on original cars. A wad of 'dum dum' to fill openings at each corner. As pictured. Attached thumbnail(s) 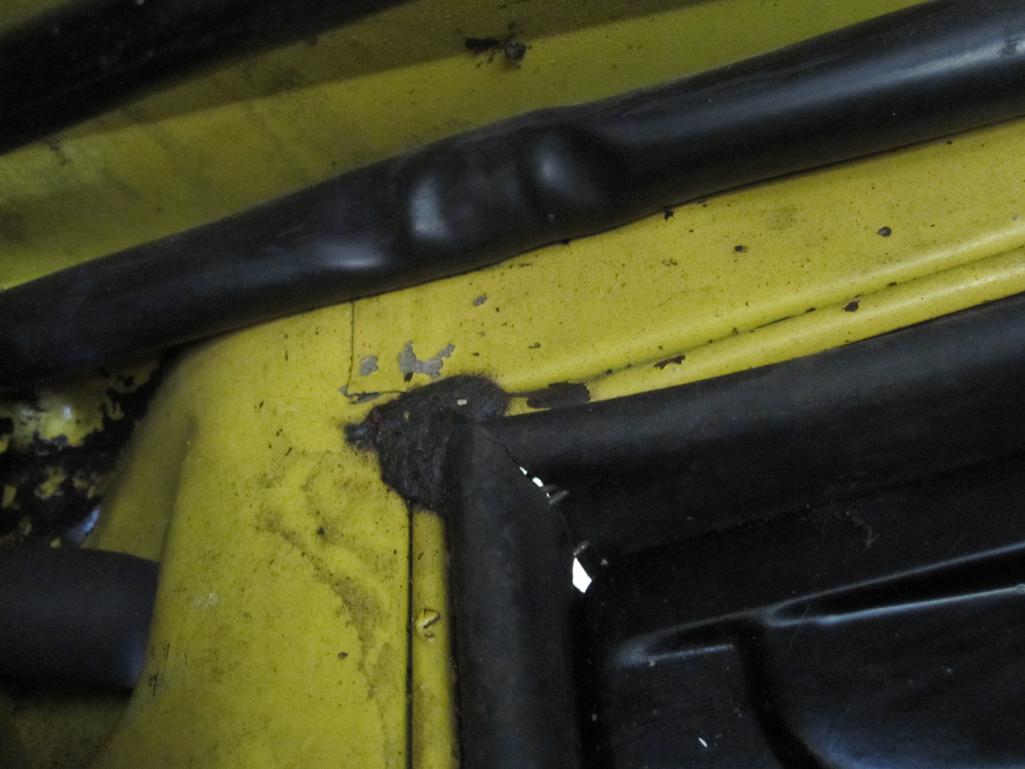 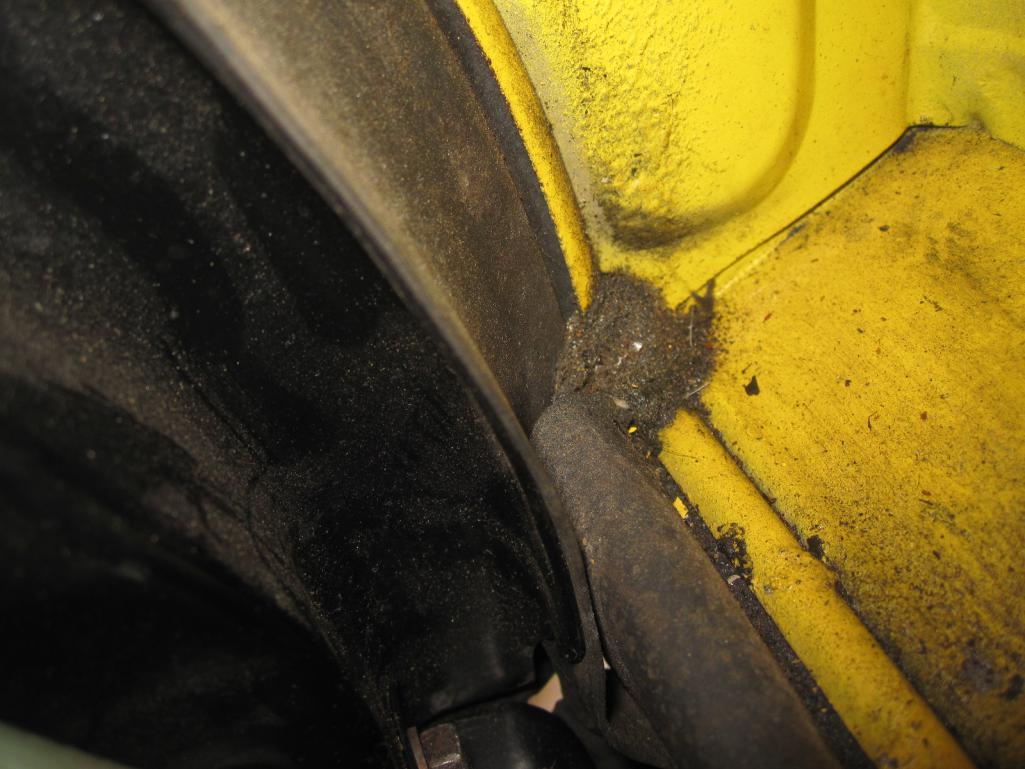
|
|
|
|
| Dlee6205 |
Apr 20 2026, 09:09 AM
Post
#9
|
|
Member Group: Members Posts: 92 Joined: 9-December 22 From: Burnsville, NC Member No.: 27,017 Region Association: South East States |
(IMG:style_emoticons/default/agree.gif) With replacing the hog rings. A small detail but it really helps hold the seal against tin.
|
|
|
|
| TRP |
Apr 20 2026, 11:21 AM
Post
#10
|
|
Member Group: Members Posts: 308 Joined: 2-September 23 From: Morgan Hill, CA Member No.: 27,559 Region Association: None |
My car had both the hog-rings and the dum-dum when I pulled the original seals a few weeks back. I wasn't sure if the dum-dum was a DAPO addition or not.
I bought the hog-rings and was planning on putting them back on there before the motor goes back in. |
|
|
|
| DennisV |
Apr 20 2026, 02:06 PM
Post
#11
|
|
Senior Member Group: Members Posts: 905 Joined: 8-August 20 From: Santa Rosa, CA Member No.: 24,575 Region Association: Northern California |
QUOTE(rgalla9146 @ Apr 20 2026, 07:58 AM) @Bruce is right about the hog rings, for some reason they are never replaced. One more detail that I've seen on original cars. A wad of 'dum dum' to fill openings at each corner. As pictured. Can you offer more insight on the hog rings and dum dum? Do these have part numbers? I will need to obtain them. Our engine bay was stripped clean, so I have no frame of reference. Another case where just browsing the forum paid off with some insights I didn't know I needed. Glad @robkammer started this thread. |
|
|
|
| TRP |
Apr 20 2026, 02:15 PM
Post
#12
|
|
Member Group: Members Posts: 308 Joined: 2-September 23 From: Morgan Hill, CA Member No.: 27,559 Region Association: None |
QUOTE(DennisV @ Apr 20 2026, 01:06 PM) QUOTE(rgalla9146 @ Apr 20 2026, 07:58 AM) @Bruce is right about the hog rings, for some reason they are never replaced. One more detail that I've seen on original cars. A wad of 'dum dum' to fill openings at each corner. As pictured. Can you offer more insight on the hog rings and dum dum? Do these have part numbers? I will need to obtain them. Our engine bay was stripped clean, so I have no frame of reference. Another case where just browsing the forum paid off with some insights I didn't know I needed. Glad @robkammer started this thread. I would be shocked if there was a part number for the hog rings, these are just metal clips with sharp points to grab stuff, often used in upholstery work. 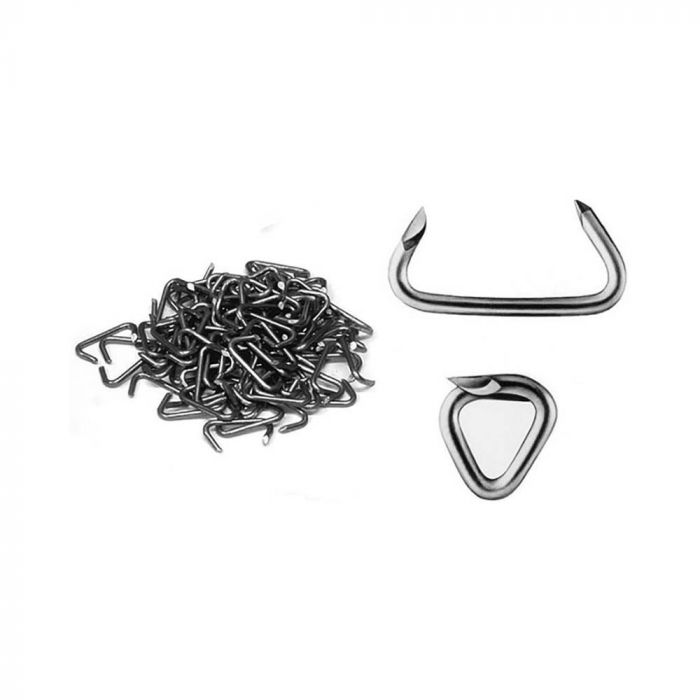 Ted |
|
|
|
| DennisV |
Apr 20 2026, 02:56 PM
Post
#13
|
|
Senior Member Group: Members Posts: 905 Joined: 8-August 20 From: Santa Rosa, CA Member No.: 24,575 Region Association: Northern California |
QUOTE(TRP @ Apr 20 2026, 01:15 PM) I would be shocked if there was a part number for the hog rings, these are just metal clips with sharp points to grab stuff, often used in upholstery work. Ted Is this where they are installed? You just buy a Hog Ring Plier Kit and squeeze 3 rings across the joining rubber seam? 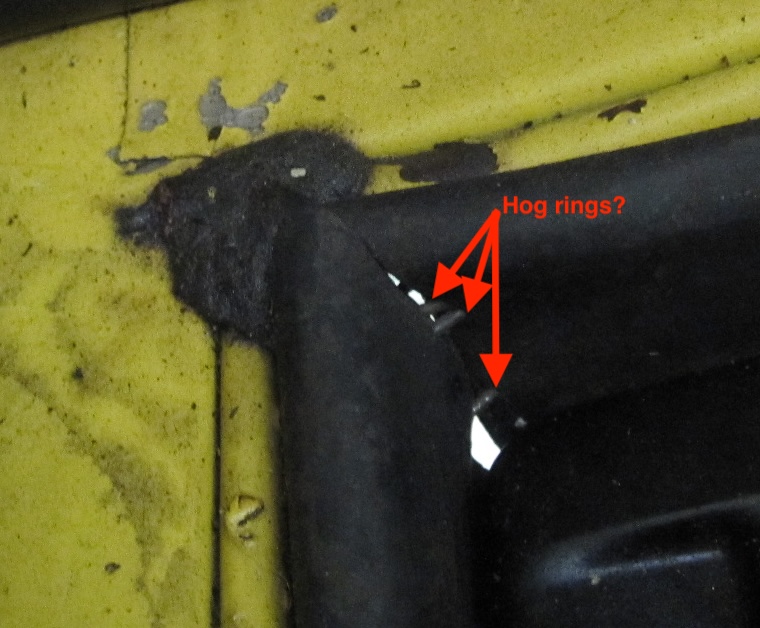 |
|
|
|
| TRP |
Apr 20 2026, 05:00 PM
Post
#14
|
|
Member Group: Members Posts: 308 Joined: 2-September 23 From: Morgan Hill, CA Member No.: 27,559 Region Association: None |
QUOTE(DennisV @ Apr 20 2026, 01:56 PM) QUOTE(TRP @ Apr 20 2026, 01:15 PM) I would be shocked if there was a part number for the hog rings, these are just metal clips with sharp points to grab stuff, often used in upholstery work. Ted Is this where they are installed? You just buy a Hog Ring Plier Kit and squeeze 3 rings across the joining rubber seam? Yup! The goal is to just keep the ends / joints from pulling away from the tins. The placement / number of rings doesn't appear to have been standardized. My car had two on one side and on on the other. I went to the jungle website and purchased this set. |
|
|
|
|
1 User(s) are reading this topic (1 Guests and 0 Anonymous Users)
0 Members:

|
Lo-Fi Version | Time is now: 21st April 2026 - 04:42 AM |
Invision Power Board
v9.1.4 © 2026 IPS, Inc.