|
|
|
Porsche, and the Porsche crest are registered trademarks of Dr. Ing. h.c. F. Porsche AG.
This site is not affiliated with Porsche in any way. Its only purpose is to provide an online forum for car enthusiasts. All other trademarks are property of their respective owners. |
|
|

  |

| frank_c |
 Feb 27 2026, 12:38 AM Feb 27 2026, 12:38 AM
Post
#1
|
|
Member  Group: Members Posts: 77 Joined: 29-December 24 From: Austin, TX Member No.: 28,542 Region Association: None |
I'm in the process of replacing a leaking Rear Main Seal, and after pulling the old seal I noticed two scratches in the case bore (honestly, it wasn't me - I have the proper tool for this (IMG:style_emoticons/default/smile.gif)).
From what I've been able to find the RMS should be installed dry, but what is the best practice to address the two scratched areas to avoid a leak? Here are some of the suggestions I found when searching: 1. Use an emery cloth to knock-down any raised edges 2. Fill scratch with high-temp JB Weld 3. Use some type of sealant at the scratch Do I use none, one, or some combination of the above (or some other) to address this? Any help would be much appreciated as I'd like to get the new seal in this weekend. 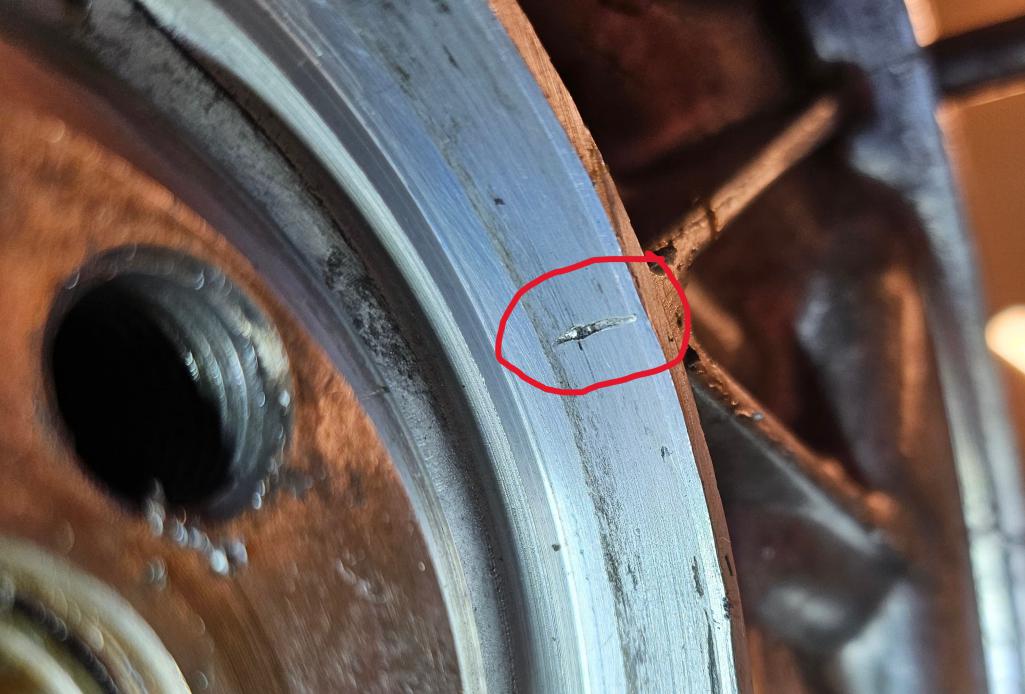 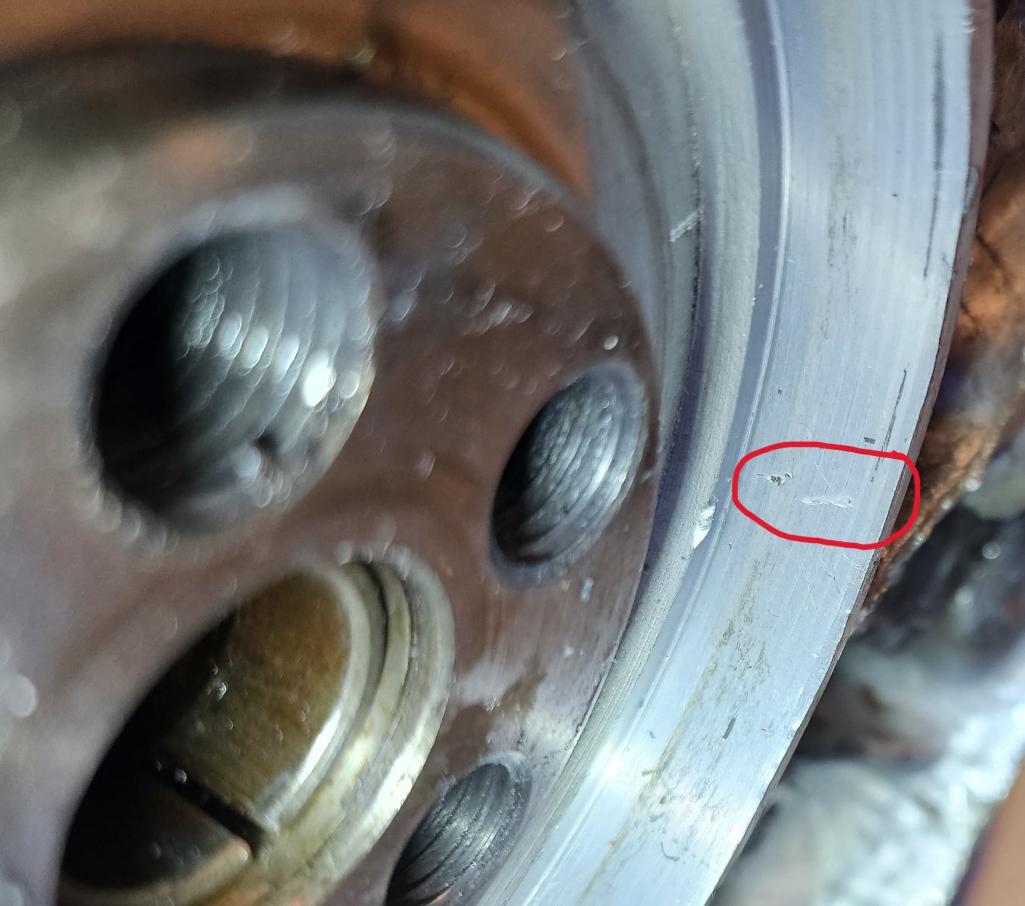 |
   |

 
|
| rfinegan |
Feb 27 2026, 07:01 AM
Post
#2
|
|
Senior Member Group: Members Posts: 1,189 Joined: 8-February 13 From: NC Member No.: 15,499 Region Association: MidAtlantic Region |
1. Use an emery cloth to knock-down any raised edges
2. JB Weld not needed 3. Use favorite sealant at the scratch and around seal |
 |
|
| Ninja |
Feb 27 2026, 09:31 AM
Post
#3
|
|
Member Group: Members Posts: 171 Joined: 25-September 25 From: Granbury Texas Member No.: 29,004 Region Association: Southwest Region |
(IMG:style_emoticons/default/agree.gif)
Those scratches are completely covered by the OD of the seal. I might put a bit of 3H (case sealant. your choice) in the big one. |
|
|
|
| 930cabman |
Feb 27 2026, 10:16 AM
Post
#4
|
|
Advanced Member Group: Members Posts: 4,511 Joined: 12-November 20 From: Buffalo Member No.: 24,877 Region Association: North East States |
QUOTE(Ninja @ Feb 27 2026, 10:31 AM)  (IMG:style_emoticons/default/agree.gif) Those scratches are completely covered by the OD of the seal. I might put a bit of 3H (case sealant. your choice) in the big one. (IMG:style_emoticons/default/agree.gif) or a shellac based sealant |
|
|
|
| Jack Standz |
Feb 27 2026, 10:59 AM
Post
#5
|
|
Senior Member Group: Members Posts: 722 Joined: 15-November 19 From: Happy Place (& surrounding area) Member No.: 23,644 Region Association: None |
For your consideration is getting a GoWesty RMS installation tool. Seems that after all these years of just using a wood block or something to pound in the seal dry, there is a better way.
The instructions include using a sealant when you install the seal and drilling a drain hole back into the case at the bottom of the seal bore. Also, the tool insures the seal ends up properly positioned (make sure there isn't a Grove on the crankshaft which could cause a leak). https://gowesty.com/blogs/article-library/f...main-seal-story |
|
|
|
| frank_c |
Feb 27 2026, 01:18 PM
Post
#6
|
|
Member Group: Members Posts: 77 Joined: 29-December 24 From: Austin, TX Member No.: 28,542 Region Association: None |
QUOTE(Jack Standz @ Feb 27 2026, 10:59 AM) For your consideration is getting a GoWesty RMS installation tool. Seems that after all these years of just using a wood block or something to pound in the seal dry, there is a better way. The instructions include using a sealant when you install the seal and drilling a drain hole back into the case at the bottom of the seal bore. Also, the tool insures the seal ends up properly positioned (make sure there isn't a Grove on the crankshaft which could cause a leak). https://gowesty.com/blogs/article-library/f...main-seal-story Thanks for the suggestion - I've seen that tool before. It looks great, but my plan was to use a bearing/seal tool to tap in the seal. One question I have though is what is the correct depth of the seal? Should it be flush with the top of the bore in the case? Will the seal be "bottomed out" at that point anyway so it can't go any further? As you mentioned, the GoWesty site for the RMS itself recommends the use of 'Vibra-TITE 550 Blue Core Plug Sealant' on the seal. This is a bonding sealant similar to Loctite 540. I have not found any other references recommending the use this type of product on a Rear Main Seal. Anyone have any experience with it? Will this make the seal difficult to remove the next time? And regarding the drilling of a hole to allow for additional oil drainage - I've also read about this modification in the past and it sounds like a good ideal, but a concern I have is aluminum shavings falling into the case during the drilling process on a assembled and sealed case. How do you prevent this from happening? |
|
|
|
| Ninja |
Feb 27 2026, 01:50 PM
Post
#7
|
|
Member Group: Members Posts: 171 Joined: 25-September 25 From: Granbury Texas Member No.: 29,004 Region Association: Southwest Region |
You could mildly pressurize the case (less than 3 PSI).
or Drill 90% of the hole, clean up, pack drill bit with grease on flukes, finish hole slowly cleaning up the bit as you go. or The best way IMO is to do the Raby mod when you have the engine apart later. Look at your crank to see if there is a score line. I always set my seal depth depending on where this line is. I AVOID this line if I can. You can see the original seal was not bottomed out. The important area to have as perfect as you can is where the seal hits the crank. Depth is not important (within reason), being equal depth is (seal straight in bore). |
|
|
|
| Jack Standz |
Feb 27 2026, 05:11 PM
Post
#8
|
|
Senior Member Group: Members Posts: 722 Joined: 15-November 19 From: Happy Place (& surrounding area) Member No.: 23,644 Region Association: None |
QUOTE(frank_c @ Feb 28 2026, 02:18 AM) QUOTE(Jack Standz @ Feb 27 2026, 10:59 AM) For your consideration is getting a GoWesty RMS installation tool. Seems that after all these years of just using a wood block or something to pound in the seal dry, there is a better way. The instructions include using a sealant when you install the seal and drilling a drain hole back into the case at the bottom of the seal bore. Also, the tool insures the seal ends up properly positioned (make sure there isn't a Grove on the crankshaft which could cause a leak). https://gowesty.com/blogs/article-library/f...main-seal-story Thanks for the suggestion - I've seen that tool before. It looks great, but my plan was to use a bearing/seal tool to tap in the seal. One question I have though is what is the correct depth of the seal? Should it be flush with the top of the bore in the case? Will the seal be "bottomed out" at that point anyway so it can't go any further? As you mentioned, the GoWesty site for the RMS itself recommends the use of 'Vibra-TITE 550 Blue Core Plug Sealant' on the seal. This is a bonding sealant similar to Loctite 540. I have not found any other references recommending the use this type of product on a Rear Main Seal. Anyone have any experience with it? Will this make the seal difficult to remove the next time? And regarding the drilling of a hole to allow for additional oil drainage - I've also read about this modification in the past and it sounds like a good ideal, but a concern I have is aluminum shavings falling into the case during the drilling process on a assembled and sealed case. How do you prevent this from happening? Agree with @Ninja . There are different thicknesses of "standard" RMS seals. This means the seal will end up at a different place on the crankshaft/Case bore when you install it. If you use the GoWesty tool, you won't have to worry about whether the seal is flush with the case,, it'll end up in the right spot and evenly spaced around the seal's perimeter. Just make sure it isn't riding on the crankshaft in a spot than has been compromised or a groove worn into it. When we used this tool, we didn't use that sealant, we used what we had. IIRC it was some form of Hondabond or Yamabond. Have used loctite 540 in the past on other projects with no complaints. On an assembled motor, metal shavings are a problem. Much safer and better if you do it during motor assembly. We have performed the GoWesty procedure on an assembled motor by using a shop vacuum during the drilling (nonstop vacuum on the hole along with frequent stops to pull the tool out to vacuum as many shavings as possible before the drill bit entered the case), then spraying brake cleaner in the hole and more brake cleaner via the strainer/oil pickup area using the straw on the can inserted between the case and oil pickup (after draining all the oil). Lots of brake cleaner, almost a whole can. Then filled the motor with oil and quickly changed it along with a new filter. If this bothers you, then don't do it! |
|
|
|
| Jack Standz |
Feb 27 2026, 05:36 PM
Post
#9
|
|
Senior Member Group: Members Posts: 722 Joined: 15-November 19 From: Happy Place (& surrounding area) Member No.: 23,644 Region Association: None |
BTW if you are performing the GoWesty oil drain hole modification to your case and the motor is still in the car, this (or similar) right angle drill chuck attachment came in handy:
https://www.amazon.com/Cordless-Attachment-...0112203dd5d80ec |
|
|
|
| frank_c |
Feb 27 2026, 11:46 PM
Post
#10
|
|
Member Group: Members Posts: 77 Joined: 29-December 24 From: Austin, TX Member No.: 28,542 Region Association: None |
Ok, since I hate oil leaks (this car had many when I got it and I fixed all but the RMS) and you guys are making me paranoid about getting the seal installed correctly, I went ahead and ordered the GoWesty tool (IMG:style_emoticons/default/smile.gif). I'll put off installing the RMS until next week when the tool gets here, but I don't plan to drill the additional drain hole at this time. If the new seal leaks, then I'll look into this when I have the engine out again later this year.
@Ninja , thanks for the suggestion to check the crank for any type of wear line where the old seal was riding on it. I saw on the GoWesty site where they polish the crank where it touches the RMS - something to consider? @Jack Standz , when you said that you used some type of sealer on the RMS, was that around the entire outer perimeter (where it seals against the case bore)? Or only in areas of the case that had defects/scratches? Just curious because most information I found says to install dry. |
|
|
|
| Jack Standz |
Feb 27 2026, 11:55 PM
Post
#11
|
|
Senior Member Group: Members Posts: 722 Joined: 15-November 19 From: Happy Place (& surrounding area) Member No.: 23,644 Region Association: None |
Put the sealant around the outside perimeter of the entire seal and lubricate the inner rubber part of the seal with oil or lubricant.
Probably best to just follow GoWesty’s instructions: Attached File(s)  GVW_191REV3.pdf ( 697.88k )
Number of downloads: 7
GVW_191REV3.pdf ( 697.88k )
Number of downloads: 7 |
|
|
|
| 914Sixer |
Feb 28 2026, 10:03 AM
Post
#12
|
|
914 Guru Group: Members Posts: 9,428 Joined: 17-January 05 From: San Angelo Texas Member No.: 3,457 Region Association: Southwest Region |
I have a factory sealing tool I can loan you.
|
|
|
|
| Ninja |
Feb 28 2026, 10:48 AM
Post
#13
|
|
Member Group: Members Posts: 171 Joined: 25-September 25 From: Granbury Texas Member No.: 29,004 Region Association: Southwest Region |
My polishing "tool" is a piece of purple Scotch Brite and WD-40. I'll remove all of the "ghosting" on the surface, but the little groove (if present) requires machining or a redi-sleeve and I normally just offset the seal to avoid it.
I use Stay-Lube marine grease (Smurf goo) inside all of my seals. I've pull stuff 2 decades later and had the blue goo still present and the seal still supple. Some seals come pre-lubed (good OEM stuff) and I clean that stuff off and replace it with the Smurf goo. I'm half and half regarding a glue/sealant on the outside. With the damage in your bore, I'd glue yours. On a Honda F series engine (90s Accord) I'll actually use 3m weatherstrip adhesive (Gorilla snot) and seriously glue the seals on the front of the engine in. They are known for blowing them out with nothing more than a little back pressure. The next technician will curse me... |
|
|
|
|
3 User(s) are reading this topic (3 Guests and 0 Anonymous Users)
0 Members:

|
Lo-Fi Version | Time is now: 28th February 2026 - 12:19 PM |
Invision Power Board
v9.1.4 © 2026 IPS, Inc.