|
|
|
Porsche, and the Porsche crest are registered trademarks of Dr. Ing. h.c. F. Porsche AG.
This site is not affiliated with Porsche in any way. Its only purpose is to provide an online forum for car enthusiasts. All other trademarks are property of their respective owners. |
|
|

  |

| frank_c |
 Feb 23 2026, 12:21 AM Feb 23 2026, 12:21 AM
Post
#1
|
|
Member  Group: Members Posts: 65 Joined: 29-December 24 From: Austin, TX Member No.: 28,542 Region Association: None |
I received my cylinder head back from having a valve replaced, and have a couple of questions regarding re-installing it.
Note: the #4 intake valve was replaced due to the adjuster wearing the tip of the valve as posted in this thread: http://www.914world.com/bbs2/index.php?showtopic=377159. There were no issues with either cylinder leaking at the base or the head, and no other work was performed to the head. Also, I left the cylinders as-is on the studs after removing the head. 1. Since the head was not machined, there was no issue with either cylinder leaking when the head was removed, and the cylinders were not removed during this time, is there any 'prep work' that needs to be done either at the cylinder/case interface, or the cylinder/head interface, before bolting the head back on? 2. Is Loctite 574 a good sealant to use under the four head stud washers that are under the valve cover (it's what I have on hand)? It looks like a black RTV was used previously, and that was starting to lose its adhesion. |
   |

 
|
| barefoot |
Feb 23 2026, 06:02 AM
Post
#2
|
|
Senior Member Group: Members Posts: 1,480 Joined: 19-March 13 From: Charleston SC Member No.: 15,673 Region Association: South East States |
Look closely at the head sealing surfaces to the cylinders. If any doubt I'd pull 1 cylinder and lap the cylinder to the head -rotary motion only. Need lapping compound of course .
Barefoot |
 |
|
| frank_c |
Feb 23 2026, 11:34 AM
Post
#3
|
|
Member Group: Members Posts: 65 Joined: 29-December 24 From: Austin, TX Member No.: 28,542 Region Association: None |
From what I can tell, the cylinder mating surfaces on the head look clean.
My primary concern was the cylinders to case seal. As you can see in the photo, it looks like a hi-temp RTV was used in this area when the engine was rebuilt sometime in the past. I was considering removing the cylinders and old sealant, and then applying Curil T2 (K2 appears to be NLA) to re-seal the cylinders & spacers to the case. However, since I had no leaks in this area prior to removing the head, I'm inclined to "let sleeping dogs lie", and just leave it as-is unless the brain-trust here states that this will almost surely result in a leak since the cylinders have been disturbed slightly by removing the head. 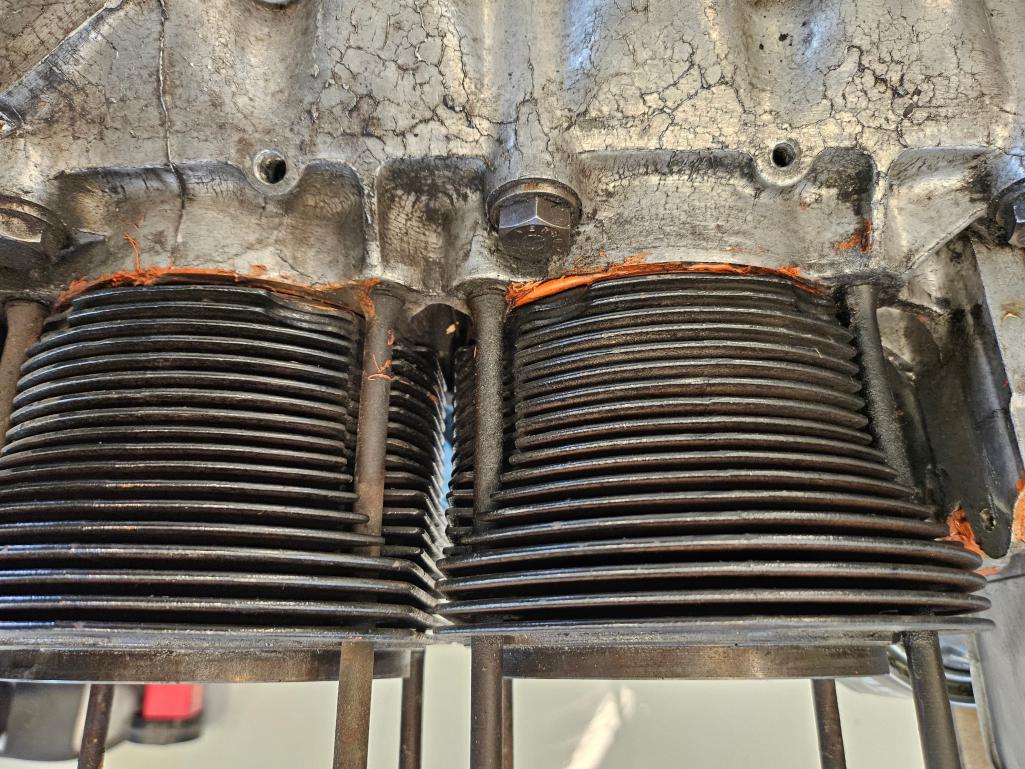 |
|
|
|
| Ninja |
Feb 23 2026, 11:45 AM
Post
#4
|
|
Member Group: Members Posts: 153 Joined: 25-September 25 From: Granbury Texas Member No.: 29,004 Region Association: Southwest Region |
If you are using the upper sealing ring (I call them fire rings, some would call them head gaskets) you will probably be OK.
These rings deform and seal up minor issues. The "now correct" use of NOTHING between the barrel and the head really requires the heads be fly cut. I consider fly cutting as an "always do" step. Personally (going cheap)I would remove all of the jugs and rings, keep them in order and direction, clean the crap out of everything, use some kind of sealant between jugs and case, lap the jugs into their respective heads, and use the fire rings if I was not changing deck height for direct to head (no fire rings) application. Doing it "right" includes both the head (fly cut) and "decking" the cases as the mounting surface on the cases tends to sag with age. At this point you should be changing the thickness of the jug to case seals to achieve .040-.050 deck height. No fire rings are used in the above process. Raby is adamant in NOT using fire rings! But in a real-world scenario where we are trying to minimize costs, I would try a real good clean up with the fire rings. This is for a base engine only, if your running 96mm bores I go Full Monty as the head sealing surface reduces by 50%. Hope this helps! |
|
|
|
| frank_c |
Feb 23 2026, 12:31 PM
Post
#5
|
|
Member Group: Members Posts: 65 Joined: 29-December 24 From: Austin, TX Member No.: 28,542 Region Association: None |
Thanks @Ninja . I should have mentioned that this is a 2.0 with 94mm euro P&C (so nothing exotic), and the cylinders do not have the upper sealing ring at the head.
I'll look into lapping the cylinders into the heads and re-sealing at the case. I'm trying to avoid going fully down the slippery slope here. |
|
|
|
| Ninja |
Feb 23 2026, 01:54 PM
Post
#6
|
|
Member Group: Members Posts: 153 Joined: 25-September 25 From: Granbury Texas Member No.: 29,004 Region Association: Southwest Region |
You should check deck height NOW!
You can alter the deck height at the jug to case point by adding/subtracting gasket thickness, sometimes adding actual shim, and machining the case mounting surface if you need to decrease height (big job-cases come apart). Hopefully all that stuff has been done, and you'll be close in your initial measurement. You want as close to .040 without being under for best quench. The jug to head seal depends on how well the surfaces match each other. Lapping them in is a minimum. I do a tiny bit of lapping and then check how evenly the mating surfaces are. If I had big areas that didn't "start out" evenly I'd have the heads flycut. Good luck! Nice to have 94mm bores in this case as the sealing surfaces are double the width of the 96mm bore |
|
|
|
| frank_c |
Feb 23 2026, 03:52 PM
Post
#7
|
|
Member Group: Members Posts: 65 Joined: 29-December 24 From: Austin, TX Member No.: 28,542 Region Association: None |
QUOTE(Ninja @ Feb 23 2026, 01:54 PM)  You should check deck height NOW! I should have pointed this out at the start: The engine was running perfectly fine and I pulled the #3/4 head due to damage to the #4 intake valve from the adjuster that I noticed while changing the pushrod tubes (I have new adjusters on the way). The shop that replaced the valve found no issues with the other valves or valve guides, so only the one valve was replaced. Given this, would the deck height need to be checked in this case (assuming it was set correctly when the engine was rebuilt some years ago)? I suppose it's easy enough to do now to confirm things - I just wanted to make sure you had all the info leading up to why the head was pulled in the first place, and the work that was performed on it. |
|
|
|
| porschetub |
Feb 23 2026, 05:26 PM
Post
#8
|
|
914 Guru Group: Members Posts: 5,022 Joined: 25-July 15 From: New Zealand Member No.: 18,995 Region Association: None |
QUOTE(frank_c @ Feb 24 2026, 07:31 AM) Thanks @Ninja . I should have mentioned that this is a 2.0 with 94mm euro P&C (so nothing exotic), and the cylinders do not have the upper sealing ring at the head. I'll look into lapping the cylinders into the heads and re-sealing at the case. I'm trying to avoid going fully down the slippery slope here. I think thats the best thing to do ,you won't be happy if those barrels leak after it all back together which there be a fairly good chance ,I only use Hylomar "blue" sealant as it is non-setting ,fuel ,oil and high temp rated . Forget BS about the top sealing ring no body in the know uses the they are a curse and I believe a VW dealers bulletin recommended not use then back in the 80's from memory. Go well and good luck ,cheers. |
|
|
|
| Ninja |
Feb 23 2026, 05:26 PM
Post
#9
|
|
Member Group: Members Posts: 153 Joined: 25-September 25 From: Granbury Texas Member No.: 29,004 Region Association: Southwest Region |
NEVER rely on another's past performance.
Easy to check now (as long as you have a dial indicator and a fixture to hold it). Hopefully it was done right. It's almost impossible to verify this unless you are where you are at now. The sealant at the base is sloppy. Commonly I will apply sealant to the gasket and then assemble. Leaves an almost imperceptible line of sealant at the parting line. I'd use Copper Coat gold spray or something like Permatex 3H. Others may have better suggestions for this seam. |
|
|
|
| Superhawk996 |
Feb 23 2026, 05:59 PM
Post
#10
|
|
914 Guru Group: Members Posts: 7,716 Joined: 25-August 18 From: Woods of N. Idaho Member No.: 22,428 Region Association: Galt's Gulch |
RTV is never good sign.
Not the right product for the job: Limits heat transfer from base of cylinder into the case Makes for a “soft” joint that is more likely to lose torque at the head studs. Makes for a less stable seal both at base of cylinders and at the cylinder to head. Squeeze out. Whatever you see on the outside - there is likely a similar squeeze out inside the engine. At best it stays put. At worst it comes lose and ends up in your oil and hopefully caught by the oil strainer and oil filter. |
|
|
|
| frank_c |
Feb 23 2026, 06:39 PM
Post
#11
|
|
Member Group: Members Posts: 65 Joined: 29-December 24 From: Austin, TX Member No.: 28,542 Region Association: None |
Thanks all for the feedback and guidance. I'll measure the deck height tonight as a sanity check before removing the cylinders.
Also, what grit compound should I use for lapping the cylinders to the head? And I agree, that sealant at the cylinder/case does not look good. |
|
|
|
| Ninja |
Feb 23 2026, 06:57 PM
Post
#12
|
|
Member Group: Members Posts: 153 Joined: 25-September 25 From: Granbury Texas Member No.: 29,004 Region Association: Southwest Region |
You actually don't need fancy crap to get an "idea" on your deck height.
A high-quality "drafting" style metal ruler is usually stupid straight and can be used as a precision straight edge. Fluorescent tubes are also very straight. Just use feeler gauges to check the deck height. I would have the engine turned 90 degrees with the cylinders straight up. Check deck height in line with the piston pins. Don't need no freaking dial indicator! |
|
|
|
| frank_c |
Feb 23 2026, 10:49 PM
Post
#13
|
|
Member Group: Members Posts: 65 Joined: 29-December 24 From: Austin, TX Member No.: 28,542 Region Association: None |
QUOTE(Ninja @ Feb 23 2026, 06:57 PM) Just use feeler gauges to check the deck height. I would have the engine turned 90 degrees with the cylinders straight up. Check deck height in line with the piston pins. Don't need no freaking dial indicator! Funny that you mention this. At first I did try the feeler gauge method, but felt I wasn't getting a accurate/repeatable measurement. So yes - I broke out the dial indicator (IMG:style_emoticons/default/smile.gif). The dial indicator was also very helpful in confirming TDC. I have the engine on a stand so it was easy to rotate it with #3&4 pointing straight up, which I found I had to do anyway to keep the dial indicator steady. So here's the report measured at the edge of the pistons in-line with the wrist pin and cylinders lightly torqued (I only had PVC pipe for spacers): #3: 0.047" #4: 0.048" I measured on the opposite side of the piston as well, and the numbers were a little higher. So, these were the lowest I was seeing. Reading for #4: 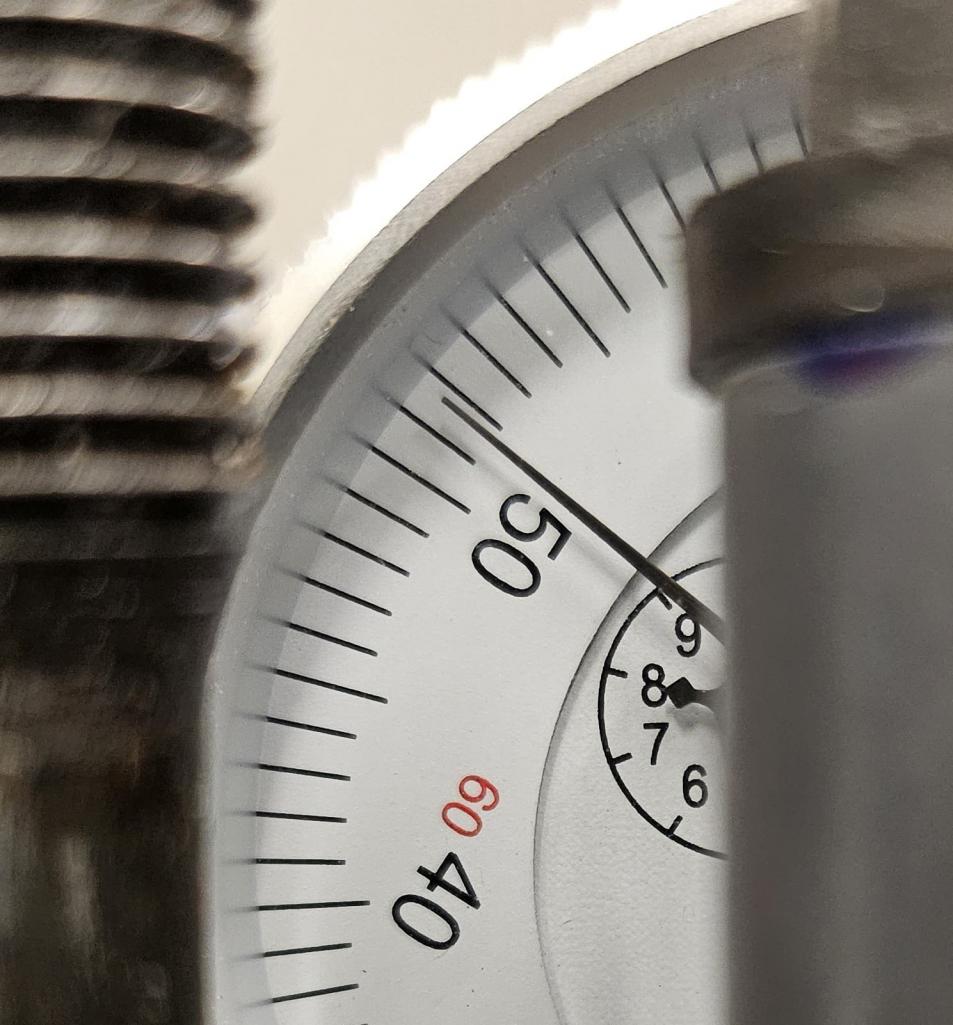 |
|
|
|
| frank_c |
Feb 23 2026, 11:24 PM
Post
#14
|
|
Member Group: Members Posts: 65 Joined: 29-December 24 From: Austin, TX Member No.: 28,542 Region Association: None |
I need to pick-up some lapping compound. Should I start with 320 grit and then finish with 600? I assume something less abrasive than what is used for valve lapping should be used here due to the aluminum?
|
|
|
|
|
9 User(s) are reading this topic (5 Guests and 0 Anonymous Users)

|
Lo-Fi Version | Time is now: 23rd February 2026 - 11:29 PM |
Invision Power Board
v9.1.4 © 2026 IPS, Inc.