|
|
|
Porsche, and the Porsche crest are registered trademarks of Dr. Ing. h.c. F. Porsche AG.
This site is not affiliated with Porsche in any way. Its only purpose is to provide an online forum for car enthusiasts. All other trademarks are property of their respective owners. |
|
|

  |

| Literati914 |
 Dec 4 2025, 01:17 PM Dec 4 2025, 01:17 PM
Post
#1
|
|
Advanced Member  Group: Members Posts: 2,171 Joined: 16-November 06 From: Dallas, TX Member No.: 7,222 Region Association: Southwest Region |
I picked up this ‘72 locally a few years back. It was just a shell .. no doors, no trunk or frunk lids, no windshield, no bumpers, no fresh air boxes or wiper assembly, no interior (expect the crappy dash), damaged wiring harness. I even had to bring front hubs and wheels just to be able to move it! The guy said he had parts somewhere but I was never able to get any if them.
The floors were Swiss cheese (see the before pics) worse than I’ve seen on a car that I’d consider a good rebuild candidate tbh. PO used bondo to fill the holes, I kid you not. The back part of the rear trunk was terrible - had been patched with fiberglass cloth that water had gotten under. Then everything covered in a bedliner product that was only sticking in about 80% of it’s coverage, including wheel wells. The body itself was in pretty good shape.. the shell had even been recently painted (original Signal Orange), but done poorly, there is literally dried clear dripping at the wheel well edges. There are also some bubbles forming in a few spots under the paint that will now need to be addressed. Over the last few years I’ve sourced most of the missing parts (that cheap parts car is paying for itself in this one). I picked up a set of unused floors from a member here a couple years ago too.. as well as ordered other needed sheetmetal items for it. So I’m now ready to start restoration on this one. I like having a thread showing the process and the before/after but admit I’m not always the best at getting it all documented. Here’s the car as it sat a couple weeks ago (with random doors, roof, etc). Attached thumbnail(s) 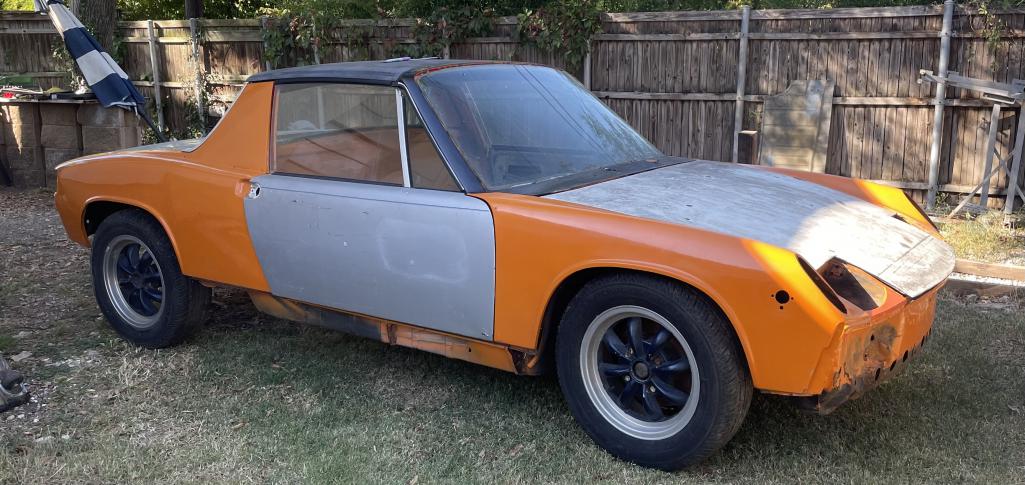
|
   |

 
|
| Literati914 |
Dec 4 2025, 01:21 PM
Post
#2
|
|
Advanced Member Group: Members Posts: 2,171 Joined: 16-November 06 From: Dallas, TX Member No.: 7,222 Region Association: Southwest Region |
Got it on jack stands.. removed the suspension, axles, etc and ditched the white hood, it was bent.
Attached thumbnail(s) 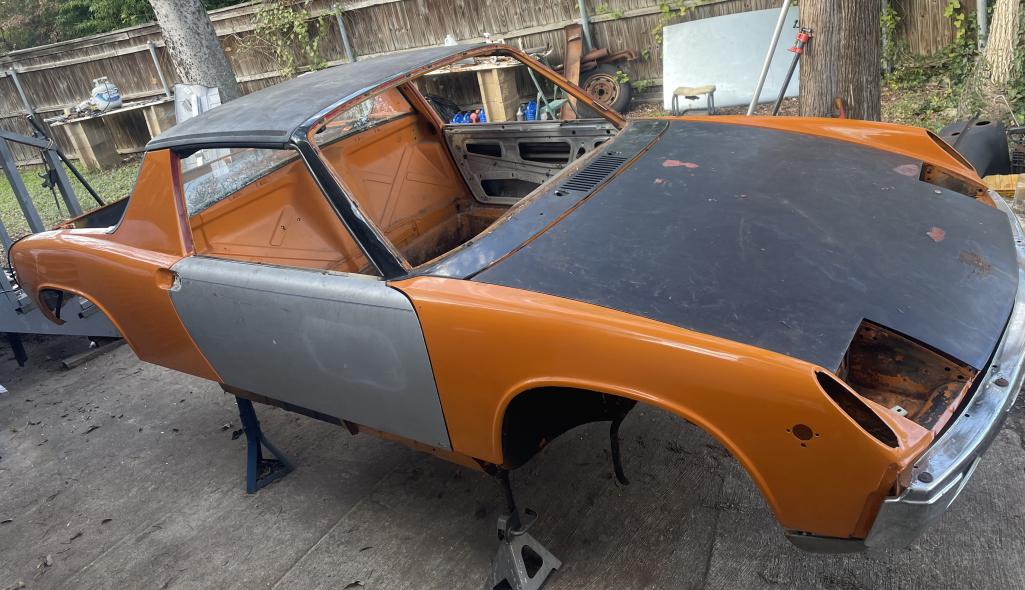
|
|
|
|
| Literati914 |
Dec 4 2025, 01:26 PM
Post
#3
|
|
Advanced Member Group: Members Posts: 2,171 Joined: 16-November 06 From: Dallas, TX Member No.: 7,222 Region Association: Southwest Region |
The floors make me wanna (IMG:style_emoticons/default/barf.gif)
Attached thumbnail(s) 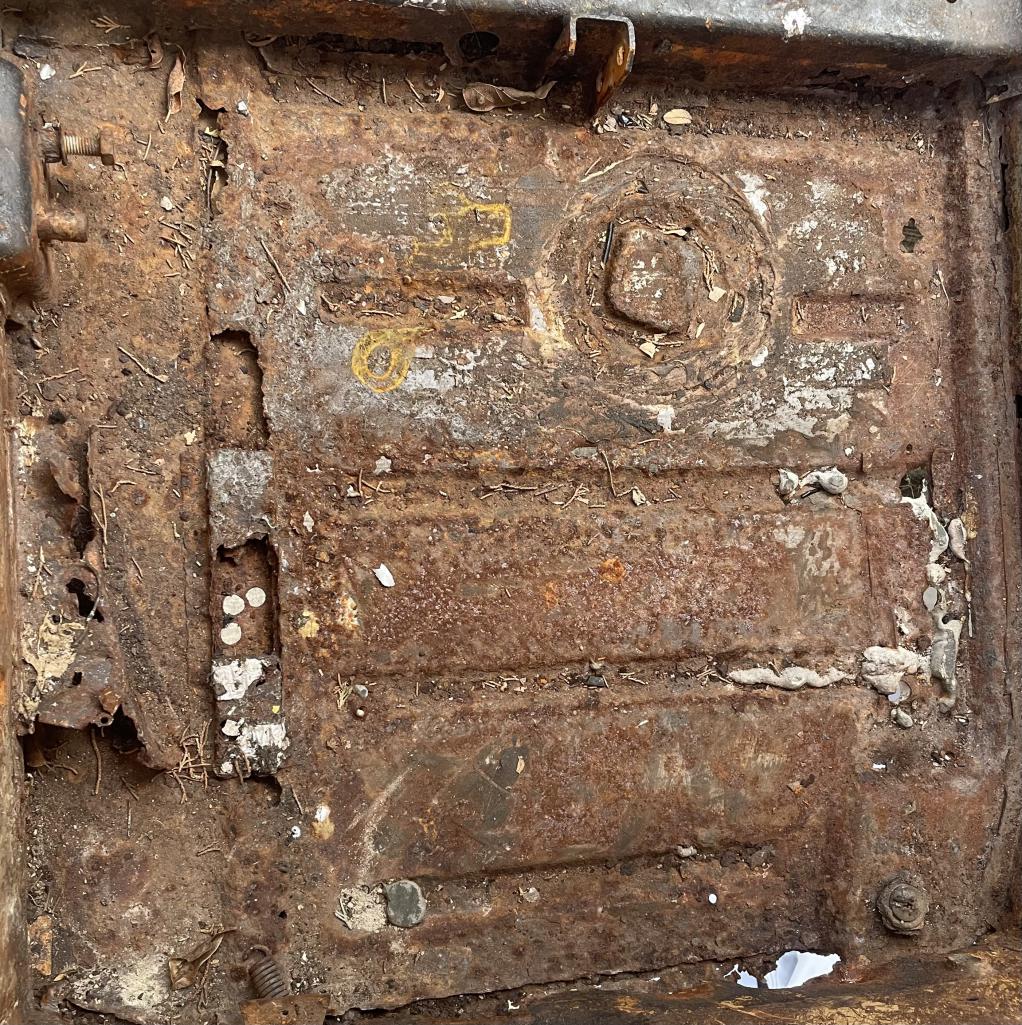
|
|
|
|
| Literati914 |
Dec 4 2025, 01:28 PM
Post
#4
|
|
Advanced Member Group: Members Posts: 2,171 Joined: 16-November 06 From: Dallas, TX Member No.: 7,222 Region Association: Southwest Region |
Bondo:
Attached thumbnail(s) 
|
|
|
|
| friethmiller |
Dec 4 2025, 01:29 PM
Post
#5
|
|
Senior Member Group: Members Posts: 1,100 Joined: 10-February 19 From: Austin, TX Member No.: 22,863 Region Association: Southwest Region |
Nice! Looks like a great car to rebuild, IMO. (IMG:style_emoticons/default/popcorn[1].gif)
I'm not too far away, if you need any assistance. (IMG:style_emoticons/default/welder.gif) |
|
|
|
| Literati914 |
Dec 4 2025, 01:31 PM
Post
#6
|
|
Advanced Member Group: Members Posts: 2,171 Joined: 16-November 06 From: Dallas, TX Member No.: 7,222 Region Association: Southwest Region |
Trunk floor - YIKES !
Attached thumbnail(s) 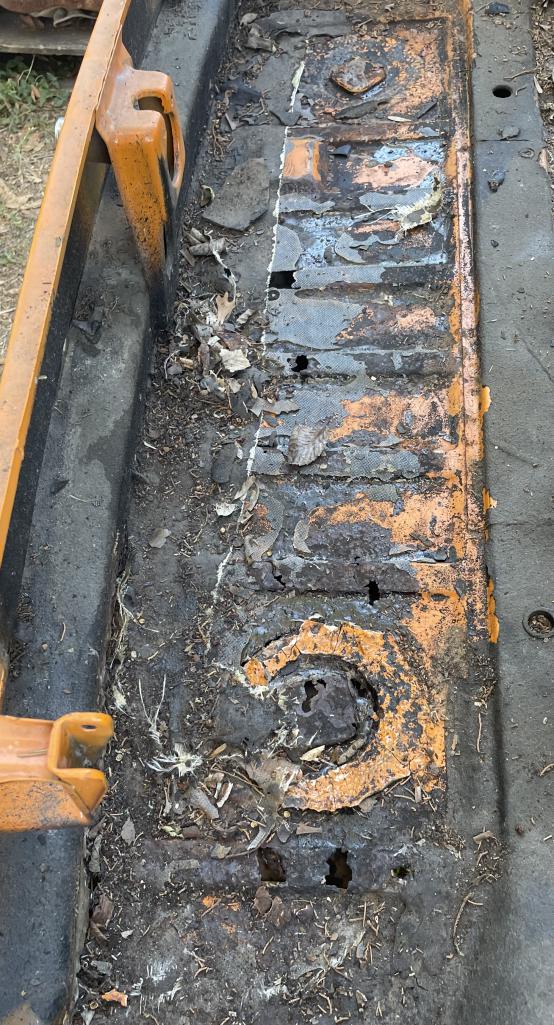
|
|
|
|
| Literati914 |
Dec 4 2025, 01:33 PM
Post
#7
|
|
Advanced Member Group: Members Posts: 2,171 Joined: 16-November 06 From: Dallas, TX Member No.: 7,222 Region Association: Southwest Region |
Replacement parts:
Attached thumbnail(s) 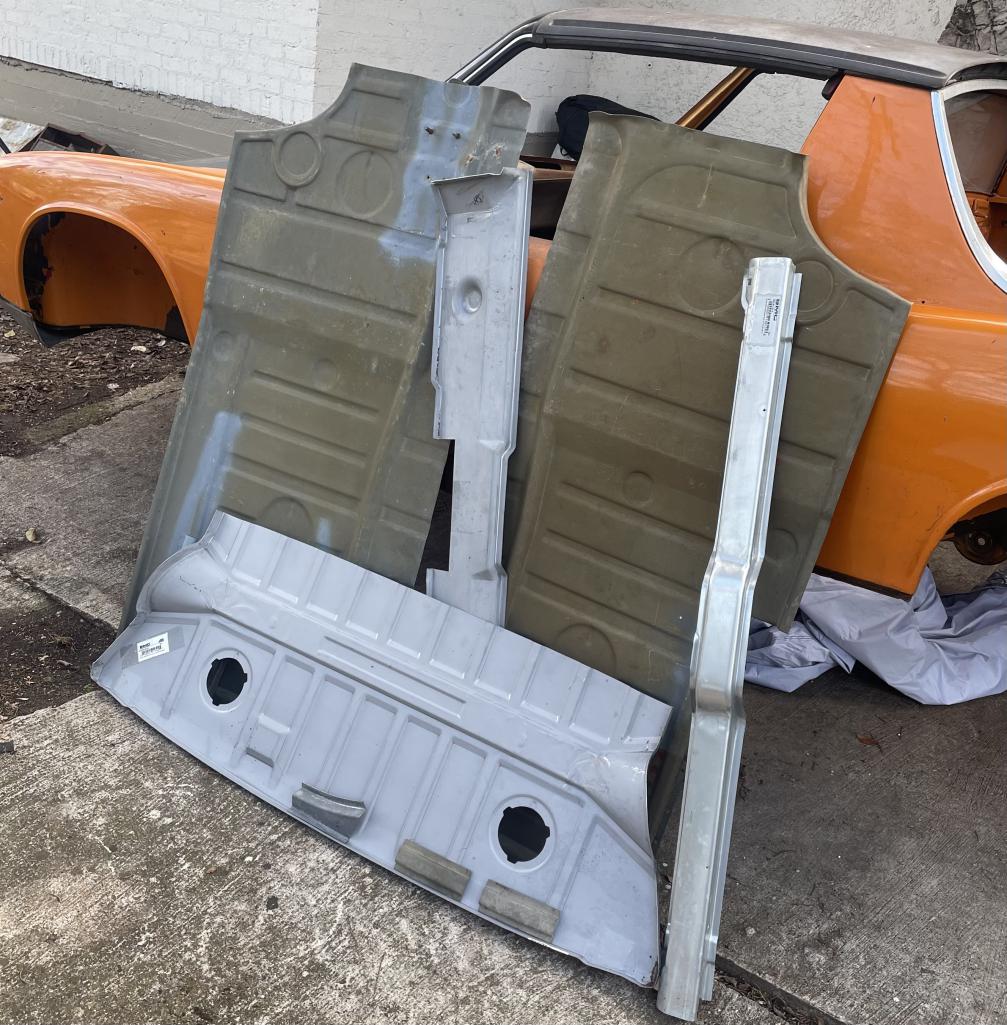
|
|
|
|
| Literati914 |
Dec 4 2025, 01:38 PM
Post
#8
|
|
Advanced Member Group: Members Posts: 2,171 Joined: 16-November 06 From: Dallas, TX Member No.: 7,222 Region Association: Southwest Region |
That trunk has been bugging me the most and so I got started on it first:
Attached thumbnail(s) 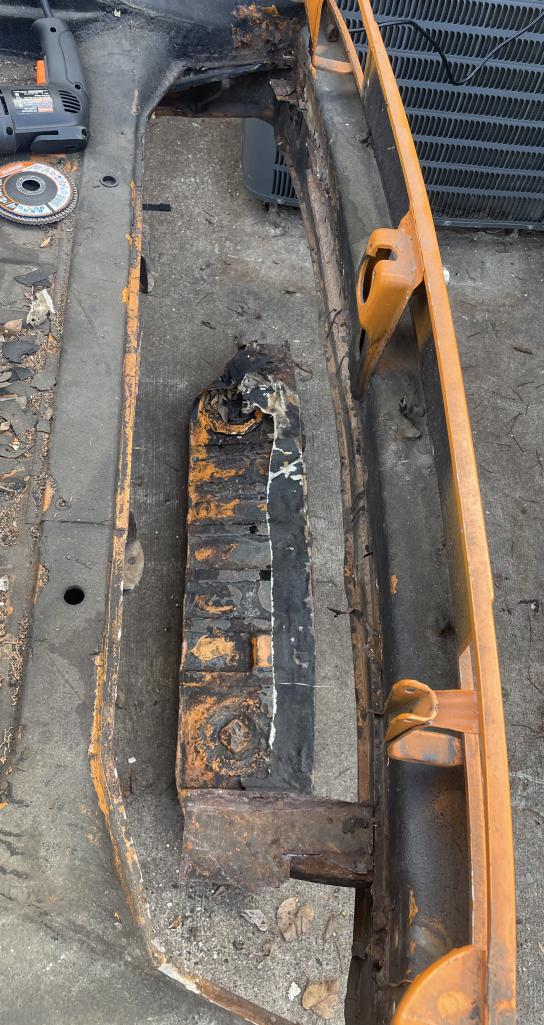
|
|
|
|
| Cairo94507 |
Dec 4 2025, 01:39 PM
Post
#9
|
|
Michael Group: Members Posts: 10,514 Joined: 1-November 08 From: Auburn, CA Member No.: 9,712 Region Association: Northern California |
Very cool project. (IMG:style_emoticons/default/popcorn[1].gif) (IMG:style_emoticons/default/beerchug.gif)
|
 |
|
| Literati914 |
Dec 4 2025, 01:41 PM
Post
#10
|
|
Advanced Member Group: Members Posts: 2,171 Joined: 16-November 06 From: Dallas, TX Member No.: 7,222 Region Association: Southwest Region |
Just cutting this panel out alone, makes the car seem sooo much better!!
Attached thumbnail(s) 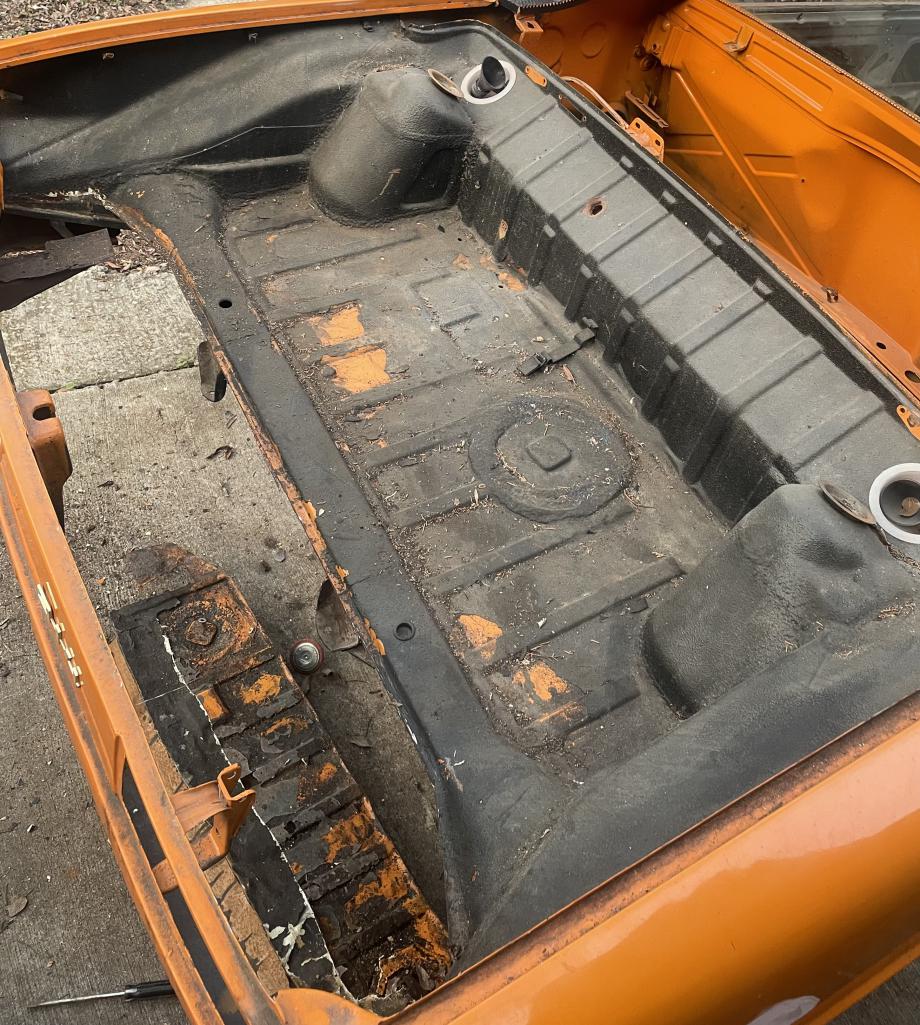
|
|
|
|
| Literati914 |
Dec 4 2025, 02:30 PM
Post
#11
|
|
Advanced Member Group: Members Posts: 2,171 Joined: 16-November 06 From: Dallas, TX Member No.: 7,222 Region Association: Southwest Region |
Next, I got busy removing the bedliner stuff (heat gun and scraper) - gotta get it ugly before it gets pretty :
Attached thumbnail(s) 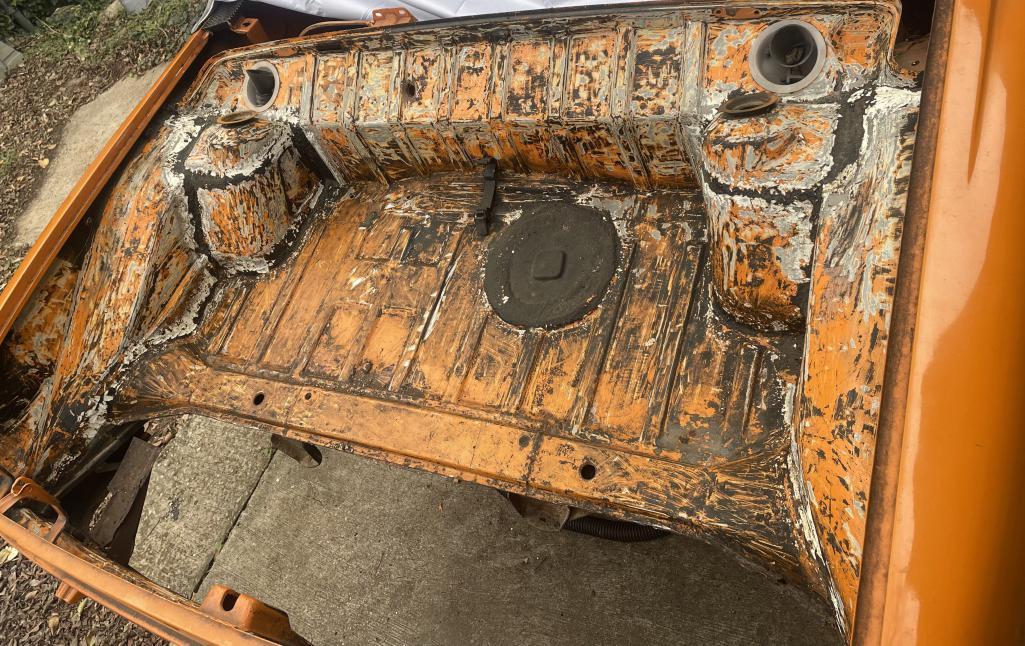
|
|
|
|
| Literati914 |
Dec 4 2025, 02:33 PM
Post
#12
|
|
Advanced Member Group: Members Posts: 2,171 Joined: 16-November 06 From: Dallas, TX Member No.: 7,222 Region Association: Southwest Region |
The fiberglass cloth used on the back edge of the trunk floor apparently trapped water enough to create some rust thru areas. This will be repaired before the new trunk floor goes in:
Attached thumbnail(s) 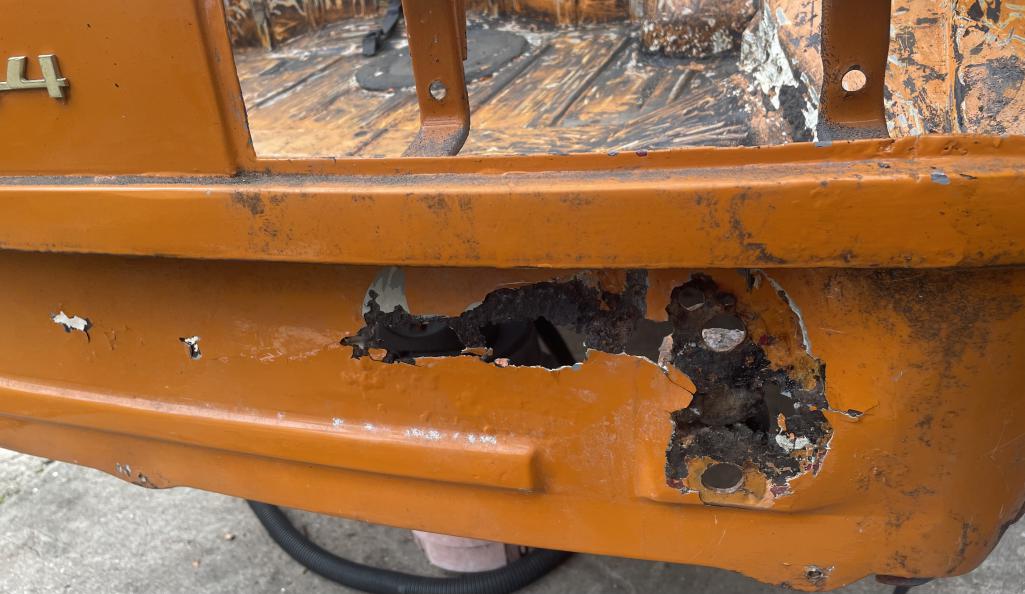
|
|
|
|
| Root_Werks |
Dec 4 2025, 03:05 PM
Post
#13
|
|
Village Idiot Group: Members Posts: 8,862 Joined: 25-May 04 From: About 5NM from Canada Member No.: 2,105 Region Association: Pacific Northwest |
Very cool project! Gotta love new panels, really makes the tub solid again.
(IMG:style_emoticons/default/welder.gif) |
|
|
|
| jesse7flying |
Dec 4 2025, 03:11 PM
Post
#14
|
|
Member Group: Members Posts: 139 Joined: 9-August 16 From: Burleson,TX Member No.: 20,281 Region Association: None |
You planning on keeping it Signal Orange? Great color on a 914, always thought it looked sharp.
Jesse |
|
|
|
| Literati914 |
Dec 4 2025, 03:15 PM
Post
#15
|
|
Advanced Member Group: Members Posts: 2,171 Joined: 16-November 06 From: Dallas, TX Member No.: 7,222 Region Association: Southwest Region |
QUOTE(jesse7flying @ Dec 4 2025, 03:11 PM)  You planning on keeping it Signal Orange? Great color on a 914, always thought it looked sharp. Jesse Yes this one will stay the original signal orange.. it's grown on me a lot since I've had the car sitting around. |
|
|
|
| trojanhorsepower |
Dec 4 2025, 04:41 PM
Post
#16
|
|
Senior Member Group: Members Posts: 1,009 Joined: 21-September 03 From: Marion, NC Member No.: 1,179 Region Association: None |
Looks fun. Good luck.
|
|
|
|
| Literati914 |
Dec 8 2025, 12:57 PM
Post
#17
|
|
Advanced Member Group: Members Posts: 2,171 Joined: 16-November 06 From: Dallas, TX Member No.: 7,222 Region Association: Southwest Region |
I cut this section off my parts car (late model) to replace the same area .. the contours are the same but I’ll have to eventually drill holes for the early bumper bolts to pass through:
Attached thumbnail(s) 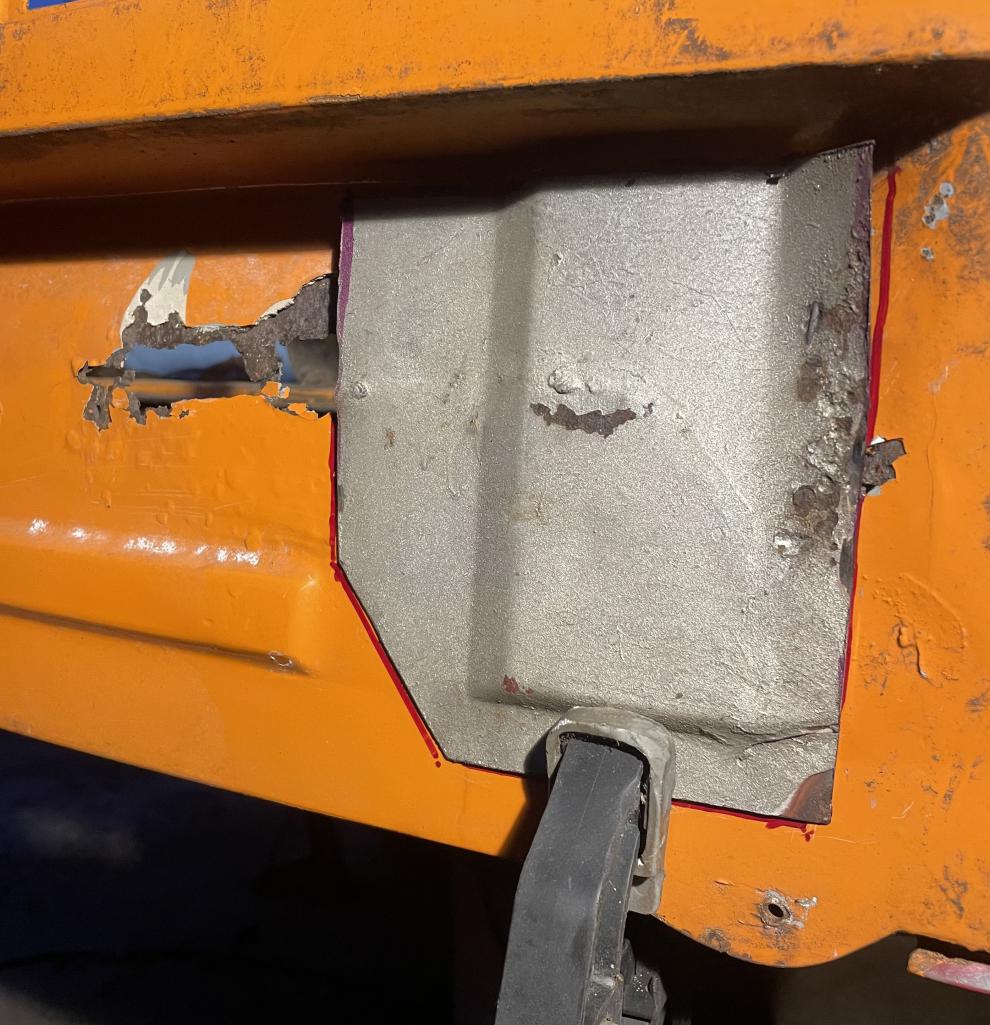
|
|
|
|
| Literati914 |
Dec 8 2025, 01:03 PM
Post
#18
|
|
Advanced Member Group: Members Posts: 2,171 Joined: 16-November 06 From: Dallas, TX Member No.: 7,222 Region Association: Southwest Region |
Here’s a shot showing the compromised metal areas cut away from the rear panel:
Attached thumbnail(s) 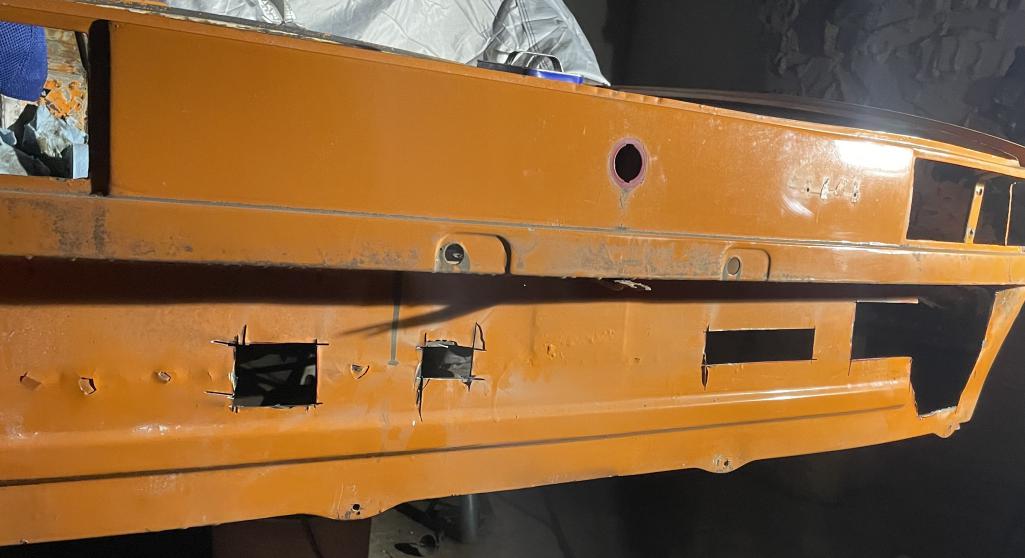
|
|
|
|
| Literati914 |
Dec 8 2025, 01:07 PM
Post
#19
|
|
Advanced Member Group: Members Posts: 2,171 Joined: 16-November 06 From: Dallas, TX Member No.: 7,222 Region Association: Southwest Region |
I cut away the edge of the piece that sits atop the crossmember, so that I will be able to weld the edge of the rear trunk piece there without the bulk. BTW that top section is still spot welded along it’s top edge:
Attached thumbnail(s) 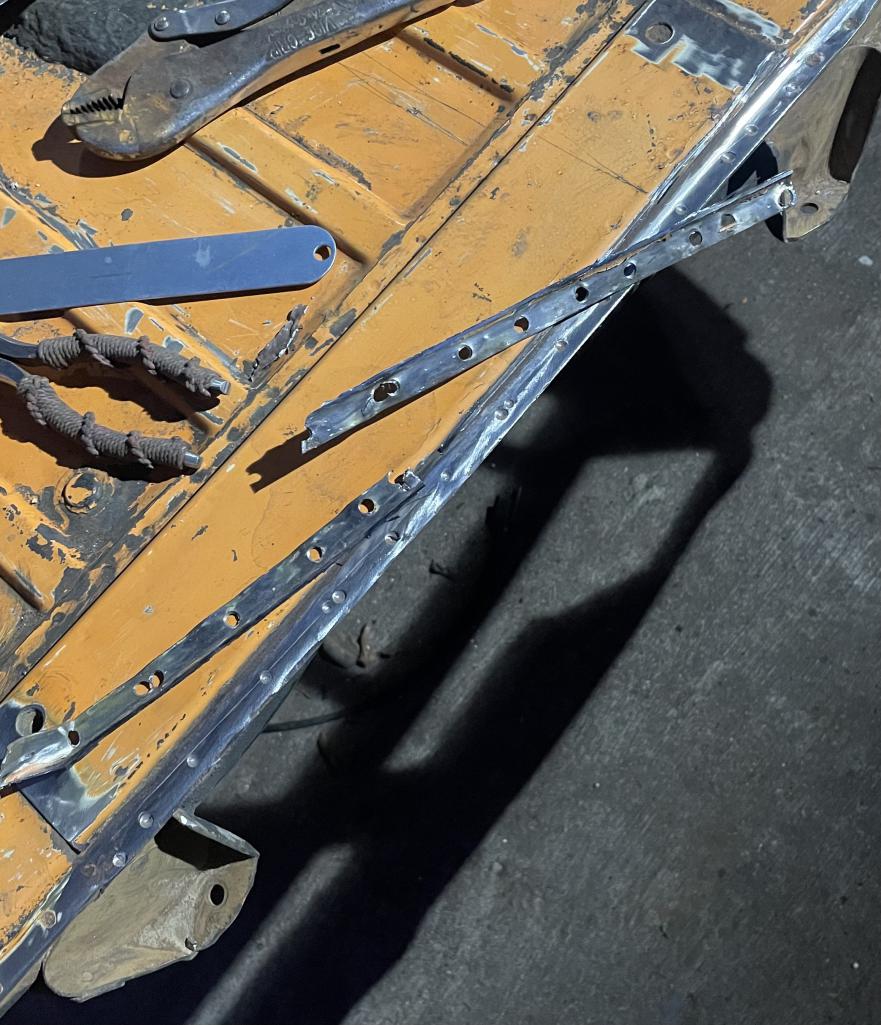
|
|
|
|
| Literati914 |
Dec 8 2025, 01:11 PM
Post
#20
|
|
Advanced Member Group: Members Posts: 2,171 Joined: 16-November 06 From: Dallas, TX Member No.: 7,222 Region Association: Southwest Region |
Since the cross member section of this car is in good condition, I decided to cut down the RD trunk panel so that it would perfectly sit on the edge of the crossmember before welding in:
Attached thumbnail(s) 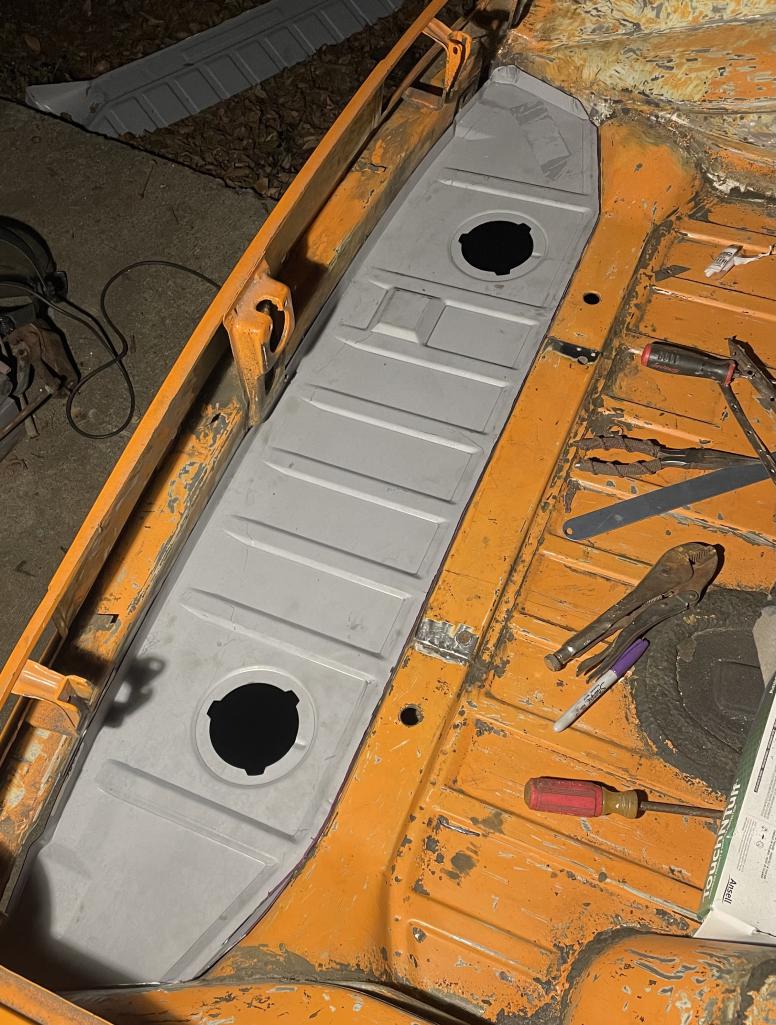
|
|
|
|
|
2 User(s) are reading this topic (2 Guests and 0 Anonymous Users)
0 Members:

|
Lo-Fi Version | Time is now: 8th December 2025 - 03:35 PM |
Invision Power Board
v9.1.4 © 2025 IPS, Inc.